Your product’s packaging is the first thing customers notice, and it can make or break their decision to buy. With 72% of consumers influenced by packaging design and only 3 to 13 seconds to grab their attention, you need packaging that stands out, communicates value, and builds trust. Here’s how to get it right:
- Know Your Audience: Research their needs, values, and frustrations. Address pain points like hard-to-open designs or lack of eco-friendly options.
- Brand Consistency: Use a clear style guide to align colors, logos, and typography with your identity.
- Competitive Edge: Study competitors and find ways to differentiate through design, messaging, and materials.
- Practical Design: Ensure durability, legibility, and ease of use. Test for shelf appeal and shipping safety.
- Regulatory Compliance: Include required info like net weight, ingredients, and allergen warnings. Follow FDA guidelines to avoid misbranding.
- Refinement Through Testing: Use prototypes, A/B testing, and feedback to perfect the design before production.
Packaging isn’t just about looks - it’s about function, clarity, and creating an emotional connection. A smart design can influence buying decisions, encourage repeat purchases, and even get shared on social media. Let’s break it down step-by-step.
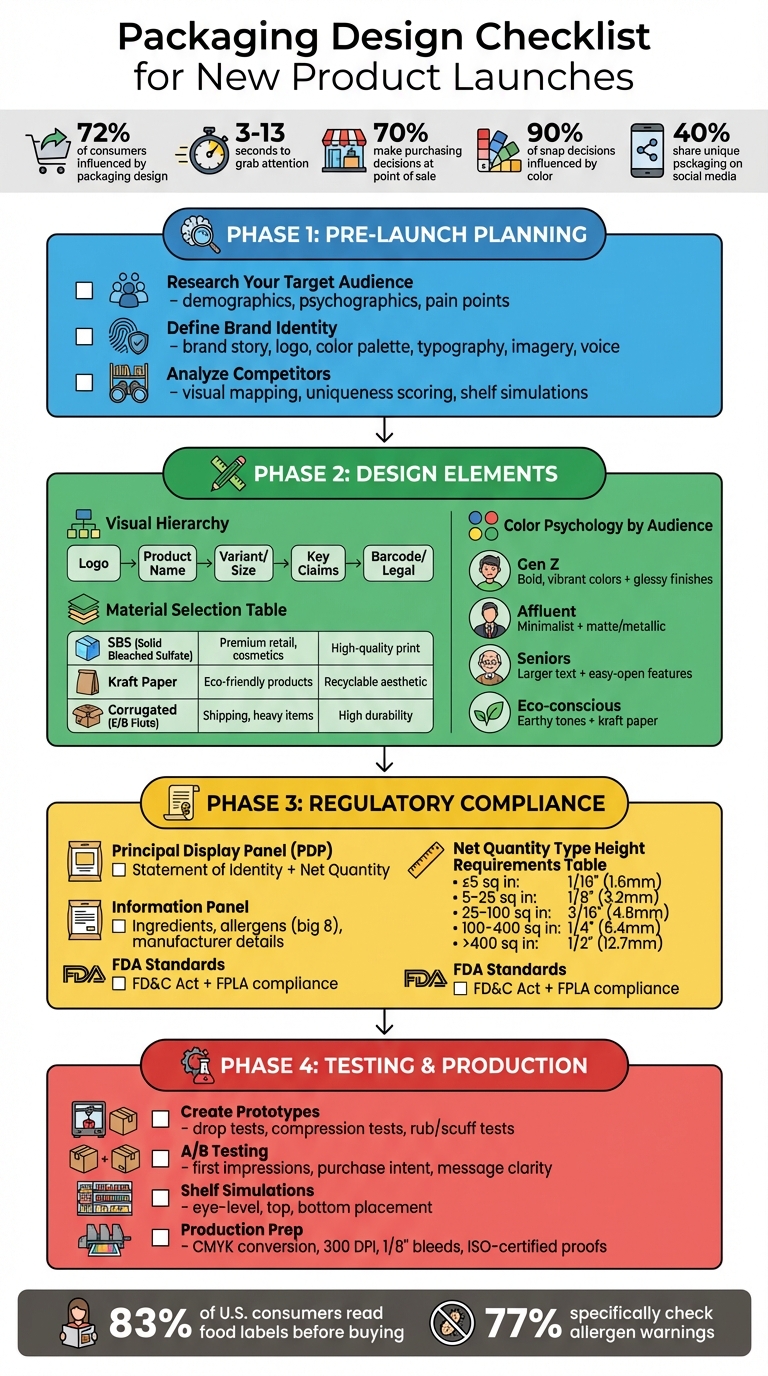
Complete Packaging Design Checklist: From Planning to Production
Pre-Launch Planning
Before diving into design, you need to start with solid research and a clear strategy. This phase determines whether your packaging will connect with shoppers or fade into the background.
Research Your Target Audience and Market
First, figure out who your audience is and where they'll interact with your product. Demographics like age and income are important, but go deeper into psychographics - factors like values, interests, and lifestyles that influence buying decisions. For example, Gen Z shoppers might prioritize personalization and sustainability, while Baby Boomers may lean toward practicality and trust.
Understand what your audience values most. Are they drawn to eco-friendly materials, a high-end look, or user-friendly designs? Research their frustrations with current packaging in your category. If competitors rely on hard-to-open clamshell packaging, offering a simple tear-open alternative could set you apart. Your design needs to address these pain points while balancing retail shelf appeal (where you have just 3 to 13 seconds to make an impression) and online unboxing experiences.
Create a detailed design brief that includes audience profiles, competitive insights, and a project overview. This will guide your design team and keep the project focused. As Wishine Ali puts it:
"Understanding the target audience is paramount in creating impactful messaging and design".
Define Your Brand Identity and Core Message
Your packaging should instantly communicate your brand’s story. To achieve this, establish a brand style guide that covers six key areas: your brand story, logo, color palette, typography, imagery, and voice. This ensures your packaging aligns with your overall brand identity and sets the right emotional tone - whether that’s luxury, fun, or simplicity.
Decide early on your brand architecture. Are you building a "House of Brands", where each product has its own identity, or an "Endorsed Brand", where the product leans on the trust and recognition of the parent company? This decision will shape how your logo, messaging, and design elements are organized. For example, plan your visual hierarchy carefully: logo first, then product name, followed by product variants and key benefits.
Keep in mind that 70% of consumers make purchasing decisions based solely on packaging at the point of sale, and 40% share photos of unique packaging on social media. Your packaging needs to make an immediate impact. Finalize your design layout and ensure all elements are positioned perfectly for production.
Analyze Competitors and Find Your Differentiation
Visit stores to create a visual map of your category. Look for patterns in competitor designs and pinpoint areas where you can stand out. Build a competitive grid comparing factors like materials, opening mechanisms, and claims.
Evaluate how your design elements - color, shape, typography - stack up against competitors using a uniqueness scoring analysis. This can help you identify opportunities to stand out. For instance, if most competitors use bold red packaging, a clean white design might catch the eye. But remember, standing out only works if it drives sales.
Test your designs in shelf simulations to see how they perform next to competitors within the critical 3-second decision window. Also, look for messaging gaps - benefits competitors aren’t highlighting - and claim that space as your unique value proposition. Considering that 90% of snap purchasing decisions are influenced by packaging color, pay close attention to how your color choices differentiate your product.
These steps lay the groundwork for creating packaging that connects with your audience and stands out in a crowded market.
sbb-itb-0c3a5ed
Design Elements: Visual and Structural Components
Once your strategy is set, it’s time to transform your packaging concept into reality. This stage combines aesthetics with functionality, ensuring your product not only looks great but also performs effectively.
Establish Visual Hierarchy and Brand Elements
Your packaging has just a few seconds to grab attention and communicate its purpose. To make the most of this brief window, arrange key elements in a clear order: Logo → Product Name → Variant/Size → Key Claims/Benefits → Barcode/Legal Information. This structure ensures a logical flow and avoids overwhelming the viewer.
Focus on one standout feature - whether it’s a bold logo, a striking graphic, or a captivating product image. When too many elements compete for attention, the message gets lost. With 72% of consumers saying packaging design influences their buying decisions and packaging messaging accounting for up to 40% of sales conversions, every detail matters.
Typography and finishes play a crucial role. Choose fonts that reflect your brand’s personality - sleek serif fonts for premium products or playful sans-serif styles for younger audiences - while ensuring they’re easy to read. Add tactile finishes like matte, soft-touch, or embossed textures to create a sensory experience that reinforces your brand. Use CMYK for standard printing and Pantone codes for precise brand colors to ensure consistent results from screen to physical packaging.
Before finalizing, test your design with a "shelf test." Place your prototype alongside competitors in a retail setting or create a Photoshop mockup. When displayed in multiples, your packaging should form a cohesive visual pattern that strengthens its shelf presence. This process ties back to the strategic decisions made during the planning phase.
Select Materials and Structural Design
While visuals draw attention, the materials and structure ensure durability and practicality.
Choose materials based on your product’s needs - size, weight, fragility, and shelf life. Fragile products may need cushioned inserts or snug-fit boxes, while liquids require moisture-resistant barriers. Material finishes like matte, glossy, or metallic can also influence how consumers perceive quality.
For precision, use dielines (flattened packaging layouts) to guide folds and cuts. Allow a clearance of 0.5–2.0 mm (about 0.02–0.08 inches) to prevent scuffs or burst seams. Kevin Keating, President of PKG Brand Design, cautions:
"Winning awards for attractive packaging means nothing if your product does not concretely lead to higher sales".
Structural design must also consider the product’s journey to the customer. E-commerce packaging, for instance, requires more durable materials - such as 32 ECT grade board - to handle multiple shipping stages, while retail packaging focuses on visual impact.
| Material Type | Common Uses | Key Benefit |
|---|---|---|
| SBS (Solid Bleached Sulfate) | Premium retail, cosmetics | High-quality print surface |
| Kraft Paper | Eco-friendly products | Recyclable, "handmade" aesthetic |
| Corrugated (E/B Flute) | Shipping, heavy items | High durability and protection |
Balancing cost and impact is essential. Standard-sized boxes are budget-friendly, while custom shapes increase production costs. Digital printing suits small batches, while offset printing is more cost-effective for large volumes. Optimize layouts to reduce waste and consider mono-materials to simplify recycling.
Prototypes are critical. Perform drop, compression, and humidity tests to identify weak points before mass production. Engage with printers early - request spec sheets and dielines to avoid alignment or color issues during production. This ensures your design aligns with both your brand and practical requirements.
Apply Color Psychology and Cultural Considerations
Once the structural design is finalized, fine-tune your packaging with thoughtful color choices that resonate with your audience.
Color influences 90% of snap purchasing decisions, making it a key factor in standing out on the shelf. However, your choices should align with your target audience’s preferences and emotional triggers.
- Gen Z favors bold, vibrant colors paired with glossy finishes.
- Affluent buyers lean toward minimalist designs with luxurious finishes like matte or metallic.
- Seniors value functionality, such as larger text and easy-to-open features.
- Eco-conscious shoppers prefer earthy tones, kraft paper, and clear recycling labels.
In the U.S. retail market, clarity is key. Consumers need to quickly understand what your product is and what it offers.
Packaging for online sales should focus on the unboxing experience, incorporating elements like custom tissue paper or branded tape. Retail packaging, on the other hand, should prioritize shelf appeal to stand out in a crowded environment. Test both physical prototypes and digital mockups to ensure text remains legible and design elements aren’t distorted by folds or shapes.
Packaging design doesn’t just sell the product - it shapes how people see your brand. 63% of consumers say packaging design impacts their perception of a brand as much as the brand name itself, and 40% share photos of interesting packaging on social media. By making thoughtful design decisions, you can create packaging that not only attracts buyers but also builds loyalty.
Regulatory Compliance and Required Information
Failing to comply with labeling regulations can lead to serious consequences, including 33% of medication errors, product recalls, fines, and a loss of consumer trust.
Include Required Labeling Information
The Principal Display Panel (PDP) - the main area consumers see - must include two key elements: the Statement of Identity (the product's common name) and the Net Quantity of Contents. The net quantity statement must be placed in the bottom 30% of the PDP, aligned with the package base, and follow specific size rules based on the panel's area.
| PDP Area (Square Inches) | Minimum Net Quantity Type Height |
|---|---|
| 5 or less | 1/16" (1.6 mm) |
| More than 5 to 25 | 1/8" (3.2 mm) |
| More than 25 to 100 | 3/16" (4.8 mm) |
| More than 100 to 400 | 1/4" (6.4 mm) |
| Over 400 | 1/2" (12.7 mm) |
The Information Panel, usually located just to the right of the PDP, must include the ingredient list (in descending order by weight), allergen declarations for the "big eight" allergens (milk, eggs, fish, crustacean shellfish, tree nuts, peanuts, wheat, and soybeans), and the manufacturer's name and address. For food products, a Nutrition Facts panel is required, featuring details like serving size, calories, Total Fat, Sodium, Protein, and other nutrients. The font size for this panel must be at least 6-point, with "Nutrition Facts" displayed prominently.
To avoid issues, follow federal guidelines closely and ensure your packaging aligns with strict regulatory standards.
Meet FDA and Industry Standards
Your product packaging must adhere to the Federal Food, Drug, and Cosmetic Act (FD&C Act) and the Fair Packaging and Labeling Act (FPLA) to prevent misbranding. Regulatory compliance is as critical as design and material choices in building consumer trust and ensuring product success. Misbranding occurs when labels are false, misleading, or incomplete.
"The FD&C Act was enacted by Congress to protect consumers from unsafe or deceptively labeled or packaged products by prohibiting the movement in interstate commerce of adulterated or misbranded food, drugs, devices, and cosmetics." - U.S. Food and Drug Administration
While the FDA doesn’t pre-approve food labels, businesses are fully responsible for their accuracy. All required information must be in English, and if another language is included, duplicate statements are necessary. Your business address must include the street, city, state, and ZIP code. If the name on the label doesn’t belong to the actual manufacturer, use phrases like "Manufactured for..." or "Distributed by...". Additionally, while not federally required, most retailers expect a UPC barcode for inventory and sales tracking.
Add Helpful Consumer Features
Beyond meeting the legal requirements, consider adding features that improve the consumer experience. For example, QR codes can link to detailed product information, preparation tutorials, or your brand’s story without cluttering the label. Use side or back panels for storage tips, preparation instructions, or other details, keeping the PDP clean and focused on your branding. For small packaging, peel-off or double-sided labels can maximize space. Safety warnings should be bold, placed on a contrasting background, and use a minimum height of 1/16 inch. Avoid placing text over images or logos to maintain clarity.
A May 2025 survey revealed that 83% of U.S. consumers read food labels before buying, with 77% specifically checking for allergen warnings and country of origin. This underscores how clear and accessible labeling can directly influence purchasing decisions.
Testing, Refinement, and Production Preparation
Create Prototypes and Test Functionality
Take your detailed design brief and put it to the test by checking how the packaging performs in practical scenarios. Start by printing your dieline at full scale on regular paper, folding it, and ensuring that cuts, creases, and glue areas align as intended.
Once you’ve created physical samples, it’s time to assess durability. Perform a basic test by dropping the package from waist height, shaking it gently, and placing a 15–20 lb load on it for one minute. If your product is fragile, include rub and scuff tests to evaluate how well the packaging withstands wear and tear. One example: a DTC candle brand reduced breakage by 82% and sped up pack-out time by 19% by switching to E-flute mailers and molded pulp inserts.
Make sure to also test for structural integrity and shipping efficiency. Minimize empty headspace in the packaging, aiming for a 5–8 mm reduction, which can help lower shipping costs. As 7Packaging aptly states:
"Good design is pretty. Great design survives shipping and still sells".
These early tests are essential to confirm that your packaging meets functional and shipping demands before gathering further feedback.
Gather Feedback and Refine Design
Testing becomes valuable only when you’re open to making adjustments based on the results. Use A/B testing to compare two design options with real consumers, focusing on metrics like first impressions, purchase intent, and message clarity. Be sure to change only one variable at a time - such as color or font - so you can pinpoint exactly what drives consumer preference.
Simulate retail environments by placing your prototypes alongside competitors on shelves at different heights (eye-level, top, or bottom) to see which design grabs attention. A heritage brand, for instance, achieved:
"a 12-point increase in purchase intent"
after a data-driven redesign. Focus groups are another great tool to uncover emotional reactions and understand why certain designs might not be connecting. For faster feedback, platforms like PickFu or UsabilityHub can provide insights from a large, remote audience.
Test structural fit using a plain white sample and verify visual elements with a fully printed sample. When analyzing feedback, stay objective - don’t let personal preferences dictate changes. Instead, ask yourself, "Does this resonate with my target audience?"
Once the design has been fine-tuned through testing, shift your attention to scaling production efficiently.
Prepare for Cost-Effective Production at Scale
With your design validated, it’s time to gear up for production. Ensure all technical specs align with industry standards. Convert artwork to CMYK using custom press profiles, set bleeds to extend 1/8" beyond cut lines, and confirm that images are at least 300 DPI at actual size. Always use the dieline templates provided by your manufacturer to account for every cut, fold, and glue flap.
Before moving to full-scale production, request an ISO-certified hardcopy proof. This step is crucial for catching any color inaccuracies, especially since 90% of snap purchasing decisions are influenced by color.
Plan ahead for logistics by defining pallet configurations, labeling master cartons, and choosing the most efficient shipping method, whether that’s flat-pack or pre-glued. Use tools like Adobe Illustrator or InDesign’s "Package" function to bundle all linked images and fonts, ensuring your printer has everything they need. If possible, have a designer present during the first print run to oversee details and set quality benchmarks.
Conclusion
Packaging design goes far beyond just making a product look good on the shelf - it’s a strategic tool that can directly impact profitability. Tony Gao, Business Director at EPACK, explains it perfectly:
"Packaging isn't just a container - it's a powerful communicator. It encapsulates your brand's essence, conveys its message, and distinguishes your product from the competition."
Here’s a striking fact: 72% of consumers make purchasing decisions influenced by packaging design. And you’ve got just 3 to 13 seconds to grab their attention. That’s not much time, which is why every detail matters - whether it’s the structure, the visuals, or the messaging.
To get it right, you need a well-thought-out approach. Start by nailing down your dieline before diving into graphics. Test your packaging for durability - drop tests are a must. And don’t forget to gather feedback from real consumers to ensure your design resonates with your audience.
The key is to strike a balance between three crucial elements: physical structure that ensures your product survives shipping, graphic design that catches the eye, and messaging that clearly communicates the benefits to your customers. Neglecting any one of these can lead to packaging that either fails to function or doesn’t stand out on the shelf. When these elements work together, they create a strong foundation for growth.
Thinking long-term is just as important. Design your packaging with scalability in mind so it can adapt to future product variations without requiring a complete redesign. This not only saves time and money but also keeps your branding consistent as your product line expands.
FAQs
How can I make sure my packaging design reflects my brand identity?
To make sure your packaging design truly represents your brand, aim for a unified visual style that highlights your brand’s values and character. Stick to consistent colors, logos, and design elements across all your packaging. This not only strengthens brand recognition but also builds trust with your customers.
Consider your target audience and what appeals to them. Whether your focus is on eco-friendliness, luxury, or practicality, your packaging should reflect their preferences while staying aligned with your brand’s personality. Every design decision - like the choice of typography, imagery, or materials - should contribute to telling your brand’s story, creating a genuine and lasting connection with your audience.
When you combine consistent visuals, a deep understanding of your audience, and a compelling story, your packaging does more than just protect your product - it becomes a powerful extension of your brand.
What should I consider to ensure my product packaging meets regulatory requirements?
To make sure your packaging meets regulatory standards, you’ll need to stick to federal guidelines set by agencies such as the FDA or USDA. This means including essential details like the product name, net weight, ingredient list, allergen warnings, and, if applicable, nutrition facts. Don’t forget to add the manufacturer or distributor's contact information - these elements are key to avoiding misbranding and ensuring consumers have accurate information about your product.
Depending on your product, you might also need to follow rules for specific claims, recycling symbols, or certifications. Since regulations can differ, staying informed about the latest laws for your target market is crucial. Focusing on these requirements during the design phase can save you from potential legal headaches and help your product launch go off without a hitch.
What’s the best way to test and improve my packaging design before production?
To fine-tune your packaging design before diving into production, start by collecting input from your target audience. This can be done through A/B testing, in-person interviews, or online surveys. These methods help you gauge first impressions, understand purchase intent, and evaluate whether your messaging hits the mark.
Next, create prototypes or sample packaging. These allow you to test the fit, functionality, and overall look in real-world scenarios. Share these samples with users or stakeholders to uncover potential problems, such as structural weaknesses or confusing design elements, before committing to large-scale production.
By addressing feedback early in the process, you can tackle issues upfront, reduce costs, and ensure your packaging not only works well but also grabs attention on the shelf.