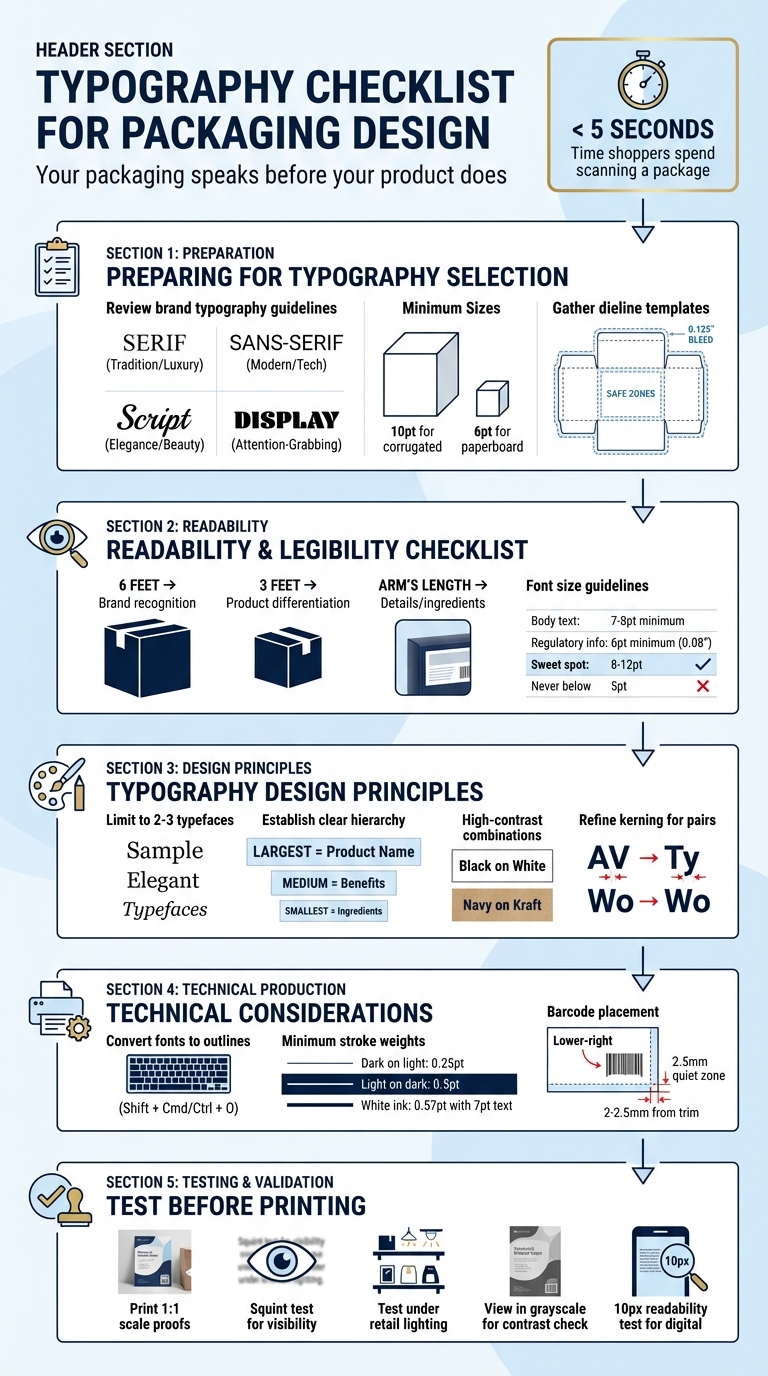
Your packaging speaks before your product does. The fonts you choose immediately convey your brand's identity - luxury, trust, or playfulness. With shoppers spending less than 5 seconds scanning a package, your typography must grab attention, communicate clearly, and reflect your brand's personality.
Here’s what you need to know:
- Font Choice Matters: Serif fonts suggest sophistication (wine), sans-serif feels modern (tech), while script fonts imply elegance (beauty).
- Readability is Key: Use font sizes that work at three distances - 6 feet (brand recognition), 3 feet (differentiation), and arm’s length (details).
- Production Details: Ensure text fits dielines, stays within safe zones, and meets printing standards for legibility.
- Hierarchy and Placement: Highlight your brand name and product benefits with larger fonts; use smaller sizes for details like ingredients.
- Test Before Printing: Always print 1:1 scale proofs, check visibility under different lighting, and test on actual packaging materials.
Typography isn’t just about aesthetics - it influences buying decisions. This guide provides actionable steps to ensure your packaging stands out, communicates effectively, and aligns with your brand.
Typography Checklist for Packaging Design: 5-Step Process
Preparing for Typography Selection
Before diving into font choices, it’s smart to gather all relevant materials and outline any project constraints. This helps prevent costly changes later and ensures your packaging aligns perfectly with your brand.
Review Brand Typography Guidelines
Start by consulting your brand's typography standards. These guidelines typically outline approved fonts for headlines, body text, and regulatory details, along with rules for font sizes, kerning, and spacing. Following these ensures consistency across your packaging.
Each font family conveys a different vibe. Serif fonts suggest tradition and trust (think luxury goods or wine), sans-serif fonts feel modern (common in health foods or tech), script fonts exude elegance (perfect for beauty products or artisan goods), and display fonts grab attention (ideal for snacks or toys). Your brand guidelines should help pinpoint the font category that best suits your identity.
Don’t forget to consider production requirements. For example, text on corrugated mailers or shipping boxes should be at least 10 points for clarity, while paperboard folding cartons can go as small as 6 points. These technical minimums ensure legibility across different materials.
Gather Product and Packaging Details
Compile all the content that will appear on your packaging. This includes product names, descriptions, ingredient lists, regulatory information, certifications, and contact details. The FDA mandates that key elements - like nutrition facts, ingredients, and your company’s name and address - must be grouped together for easy readability.
Next, get the dieline template from your printer. This blueprint shows where the package will be cut, scored, and folded. It also highlights bleed zones (usually 0.125 inches beyond the cut line) and safe zones (at least 0.125 inches inside the cut line). Keeping text within the safe zone prevents it from being trimmed during production. If your design involves shrink sleeves, remember that typography and barcodes need to be positioned sideways to account for distortion during application.
Once you’ve gathered all this information, you’ll be ready to choose typography that balances readability with strong shelf appeal.
sbb-itb-0c3a5ed
Readability and Legibility Checklist
Your typography needs to grab attention instantly. With consumers spending less than 5 seconds looking at a package before moving on, every word must pull its weight. Text should be readable from various distances and under all types of retail lighting, whether it’s bright fluorescents or dim, shadowy shelves.
Set Appropriate Font Sizes
Font size matters - a lot. The sweet spot for most text is 8–12 points. For body text, like product descriptions or instructions, aim for at least 7–8 points. Regulatory information shouldn’t dip below 6 points (around 0.08 inches), as anything smaller than 5 points becomes tough for most people to read.
Packaging must communicate effectively at three key distances:
- 6 feet for brand recognition
- 3 feet for product differentiation
- Arm’s length for details like ingredients or instructions.
Prioritize font sizes accordingly: the largest for your brand name, slightly smaller for the product name, and progressively smaller for descriptions and ingredients. If your design uses uncoated or textured materials, bump up the font size by 1 point to counteract ink spread (dot gain), which can blur fine details under poor lighting.
Always test these sizes in realistic settings to ensure they work as intended.
Test for Shelf Visibility
Font size is just one piece of the puzzle. You also need to check how your text performs when viewed from a distance. Digital proofs can be misleading, so always print 1:1 scale proofs and review them from several feet away. Try the squint test: squint at your packaging to blur out details - whatever remains visible is what shoppers will notice during their quick scan.
Take prototypes to retail environments and test them under different lighting conditions, from bright overhead lights to dim lower shelves. To evaluate contrast, view your design in grayscale - this removes the distraction of color and highlights whether your text stands out enough. High-contrast combinations like black on white or navy on kraft paper tend to perform best across various lighting setups. Be cautious with glossy coatings or foil finishes, as they can cause glare under directional LEDs, making thin text harder to read.
Verify Text Placement
Once your text is readable and visible, make sure it’s positioned strategically. Keep text within safe zones to avoid being trimmed during production. For stand-up and flat pouches, maintain a margin of at least 0.08 inches (2 mm), and for flat-bottom pouches, increase this to 0.1 inches (2.5 mm).
Place critical information - like your brand and product names - at the top or center of the package, where shoppers’ eyes naturally go first. For longer text blocks, such as instructions or ingredient lists, use left alignment to follow the natural reading flow. Center alignment can work for short elements like taglines or logos, but it’s less effective for longer paragraphs, which can become harder to scan.
Typography Design Principles
Once readability is ensured, it's time to let your typography reflect your brand's personality. Typography does more than just convey information - it shapes how your audience feels about your brand. Think of it as your brand's "voice", instantly setting the emotional tone for your message. To achieve this, choose typefaces that not only align with your brand's identity but also create a clear hierarchy and maintain proper spacing.
Define Typographic Personality
Every font carries its own emotional weight. Serif fonts like Garamond evoke tradition and authority, while sans-serif fonts feel sleek and contemporary. For instance, Apple's custom "San Francisco" typeface uses precise, geometric letterforms to communicate innovation and premium quality across its devices and packaging. Script fonts, on the other hand, suggest elegance and creativity, making them ideal for beauty brands, while bold display fonts exude energy, perfect for snack foods or toys.
Your font choice should align with your brand's archetype. For example, rounded sans-serifs work well for brands that emphasize warmth and security, while geometric sans-serifs suit brands focused on technology and progress. A great example is Mailchimp, which paired a quirky serif (Cooper Light) with a clean sans-serif during its rebrand, positioning itself as a "creative partner". Also, consider the technical details: fonts with large x-heights and open counters are easier to read at smaller sizes, while fonts with long ascenders and descenders need more generous line spacing.
It's also crucial to test your typography on actual packaging. For instance, high-contrast serif fonts look stunning when foil-stamped on rigid boxes, while bold sans-serifs are better suited for matte-finished folding cartons.
Limit Typeface Variety
Stick to two or three typefaces to keep your design polished and professional. A "Two-Font System" works well: one font for headlines and branding, and another for body text and details. This approach keeps your design clean while still allowing for enough variety to establish hierarchy.
"For most design projects, a simple pairing of two fonts—a display typeface and a body typeface—is entirely sufficient. You can effectively create structural hierarchy by utilizing the various weights within those font families." - Kevin Keating, President of PKG Brand Design
Choose font families with multiple weights (like Light, Regular, Bold) and styles (such as Italic) to give you flexibility. Pair fonts with shared characteristics, like similar x-heights or stroke contrasts, to maintain visual harmony. Decorative fonts should be reserved for logos or headlines - avoid using them for text-heavy elements like ingredient lists or instructions.
Establish Typographic Hierarchy
A clear hierarchy helps guide the reader's eye to the most important information first. Without it, your design can feel chaotic, making it harder for consumers to process. Use the largest and boldest fonts for your product name, slightly smaller fonts for secondary details (like benefits), and the smallest sizes for ingredients or instructions. Keep in mind that shoppers spend less than five seconds scanning packaging before making a decision.
Size and weight variations create clear distinctions, while high-contrast color combinations - like black text on white or navy text on kraft paper - boost legibility. For short taglines or logos, center alignment works well, but for longer text blocks, left alignment is easier to read. Be sure to leave enough whitespace to avoid a cluttered look. Always print mockups to check that your hierarchy works at actual size and on curved or textured surfaces.
Refine Kerning and Spacing
Kerning, or the space between individual letters, is key to achieving a visually balanced design. Pay close attention to tricky letter pairs like "AV", "Ty", or "Wo", which often need adjustments. Similarly, ensure your line spacing (leading) is generous enough to prevent text from feeling cramped, especially in longer paragraphs on the back of packages.
Testing is essential. Print your design at full scale to see how your spacing choices translate to the physical product. What looks perfect on a screen might feel too tight or loose in real life. These refinements should be part of your overall packaging checklist to ensure a cohesive, consumer-friendly design.
Technical Considerations for Production
Once the design is finalized, it's crucial to ensure that your typography and other design elements translate seamlessly into the finished product. These technical checks help maintain consistency and ensure the design intent remains intact. Even the most well-crafted typography can lose its impact if production guidelines aren't followed.
Convert Fonts for Printing
To ensure your typography appears as intended during printing, convert all text into vector shapes. This process, known as outlining fonts, prevents any issues if the printer doesn’t have access to the specific typeface. In Adobe Illustrator, you can outline fonts using Shift + Cmd/Ctrl + O. Always save an editable version of your file before outlining, as this step makes the text uneditable.
Alternatively, you can embed fonts in your PDF. This option keeps the text editable while giving the printer access to the typeface. However, be mindful of font licensing restrictions. Check the font's End User License Agreement (EULA) to confirm that it allows for commercial printing and redistribution. Before finalizing, double-check kerning and tracking, particularly if you’re using foil printing, as tight spacing can lead to letters merging.
Ensure Proper Stroke Weights
Thin lines and delicate serifs can cause issues during certain printing processes, such as foil stamping or letterpress. To avoid problems:
- For dark text on a light background, use a minimum stroke weight of 0.25 pt.
- For reversed text (light on dark), increase the stroke weight to at least 0.5 pt to prevent ink spread.
- When using white ink, which is thicker due to titanium dioxide, ensure text is at least 7 pt in size with a stroke weight of 0.57 pt or more.
Flexographic printing is particularly prone to thickening direct text and compromising fine details in reverse text. Lines running against the machine direction may need a heavier stroke weight (around 1.25 pt) compared to lines running with it (approximately 1 pt). Additionally, avoid using metallic or pearlescent inks for small lines or type, as they don’t hold fine details well.
Once you’ve optimized stroke weights, double-check all other design elements, such as barcodes, to ensure proper placement.
Position Barcodes Correctly
Barcodes must be placed on a flat, scannable surface, ideally in the lower-right corner of the back panel. Leave a quiet zone of 2.5 mm (about 0.1 in) of clear white space on both sides and ensure the barcode is at least 2–2.5 mm (roughly 0.08–0.1 in) from the trim edge. Avoid placing barcodes across seams, curves, folds, or creases, as these can interfere with scanning.
"In general, place the barcode on a flat, scannable surface with enough quiet zone space around it. Avoid seams, curves, folds, closures, and areas likely to be covered by labels or design elements." - GS1 Standards Guide
Barcodes should be printed in black on a white or similarly high-contrast background. Avoid using red or orange backgrounds, as scanners may struggle to read them. Additionally, steer clear of applying varnish, foil, embossing, or high-gloss finishes over the barcode unless testing confirms that these won't affect readability. Before finalizing, print a reduced version of your design, cut and fold it, and confirm that the barcode remains visible and scannable after assembly.
Brand Alignment and Final Refinements
Once technical production needs are addressed, the final step ensures your typography not only aligns with your brand but also performs effectively in front of your audience. This stage combines brand consistency checks with practical testing to confirm that your typographic choices drive both engagement and sales.
Integrate the Consumer First® Approach
Typography does more than make your packaging look good - it sets the emotional tone and conveys your brand's personality before a consumer even reads a word. At PKG Brand Design, the Consumer First® approach prioritizes consumer insights over aesthetics, ensuring your typography resonates with your target audience.
The psychology behind fonts is key here. Serif fonts evoke tradition, trust, and luxury, making them perfect for products like wine or high-end cosmetics. Sans-serif fonts, on the other hand, bring a sense of modernity, simplicity, and efficiency, which works well for tech gadgets or health-focused items. Meanwhile, script or handwritten fonts convey a sense of craftsmanship and individuality, ideal for boutique or eco-friendly brands. Considering how little time consumers spend evaluating packaging, your typographic choices must create an immediate connection.
Your font selection should also reflect your audience. For example, use playful fonts for children, sleek and modern ones for health-conscious buyers, and refined styles for luxury shoppers. To refine these choices, rely on A/B testing to see which fonts generate more trust or engagement. Consumer feedback is especially useful for ensuring legibility, particularly for older audiences or those with visual impairments.
Test and Proof Across Formats
After achieving production precision, further testing ensures your typography meets both brand and consumer expectations. Tools like 3D mockups or physical prototypes help confirm that your typography is visible and effective. Always build on the dielines provided by the manufacturer to account for cuts, folds, and glue flaps.
Make sure the brand name and key benefits are easy to read from a "shelf height" or arm's-length distance. For digital marketplaces, apply the 10px readability test: if your font is hard to read at 10px on a screen, it’s likely to fail in a retail setting too.
Finally, proofread every text element - nutritional facts, barcodes, warnings - to meet both regulatory and brand standards. Conduct a retail environment audit, whether in-store or online, to see how your typography stacks up against competitors and performs under actual shelf conditions. This thorough validation process minimizes the risk of costly reprints and ensures your typography achieves the desired impact at every consumer touchpoint.
Conclusion
Typography isn’t just about making things look good - it’s a powerful tool that influences consumer decisions. With shoppers spending less than 5 seconds evaluating packaging, your typography has to work hard. It needs to quickly communicate value, establish trust, and guide attention to the most important details.
This guide covered key practices to help you achieve that: creating a clear visual hierarchy so brand names and benefits stand out, ensuring high contrast for readability in different lighting conditions, and sticking to 2–3 fonts to keep your design clean and focused. And don’t forget - what looks great on a screen might not translate perfectly to print, so always check physical proofs.
By following these principles, you’ll not only simplify your design process but also strengthen your brand’s message. Whether you’re using serif, sans-serif, or script fonts, your choices should reflect your brand’s personality and resonate with your audience.
At PKG Brand Design, we combine these typography strategies with our Consumer First® approach to ensure every detail of your packaging supports and amplifies your brand story.
FAQs
How do I pick the right font for my brand?
Choosing the right font means matching it to your brand’s identity, message, and the feelings you want to inspire. A readable font that mirrors your brand’s personality - whether playful, professional, sleek, or high-end - is key. Fonts can also project traits like sophistication or reliability, so pick one that enhances your brand’s story, grabs attention, and clearly delivers your message. The right choice helps build recognition and fosters a connection with your audience.
What’s the smallest font size I can safely print?
For packaging design, it's generally recommended to use a font size of at least 8 pt for better clarity, though 6 pt is typically the smallest size you can print. Keep in mind that the printing method and material play a big role in how readable smaller text will be. Always test to ensure legibility.
Should I outline fonts or embed them in the PDF?
When it comes to packaging design, outlining fonts is a smart move to ensure a consistent appearance, particularly for logos and headlines. By converting text into vector shapes, you eliminate the risk of font dependency issues, making sure your design looks exactly as intended.
On the other hand, embedding fonts keeps the text editable, but it can lead to substitution problems if not handled properly. If you choose to embed fonts, double-check that they are correctly included to avoid any printing errors. Outlining remains the more dependable option for ensuring precise reproduction of your design.